Report Scheduler - Screen Objects
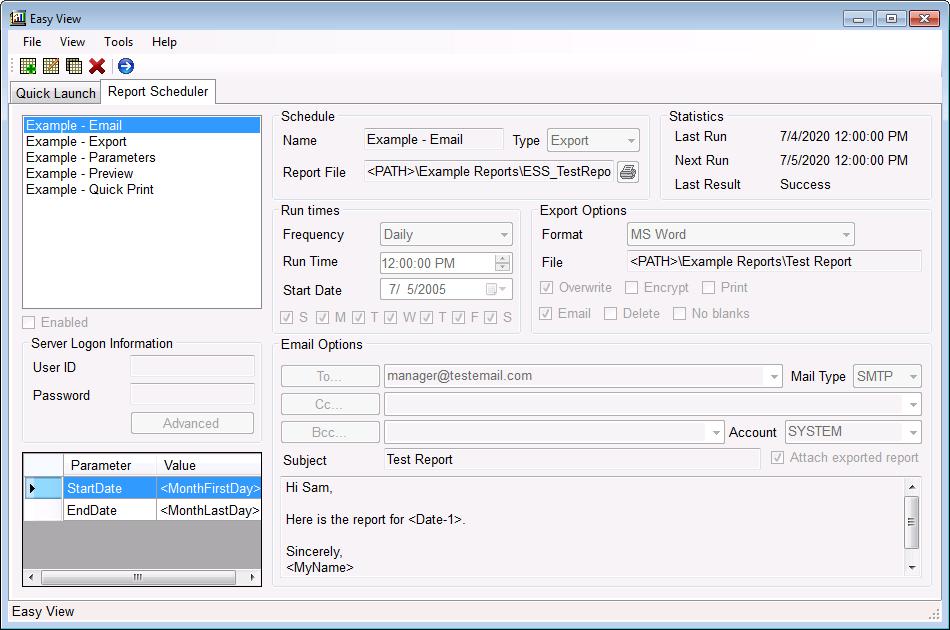
- [1] Tool Bar
- New - Create a new schedule. This button becomes the "Cancel" button when
in edit mode.
- Edit - Edit the selected schedule. This button becomes the
"Save" button when in edit mode.
- Copy - Copy the selected schedule.
- Delete - Delete selected schedule.
- Run Now - Run selected schedule.
- [2] Tab Bar
- Quick Launch Tab -
Click this tab to view the Quick Launch screen.
- Report Scheduler Tab - Click this tab to view the Report Scheduler screen.
- [3] Schedule List
List of schedules. Right clicking on a schedule brings up a popup menu with
more options.
- Popup Menu
- Run Now
Run report immediately.
- New schedule
Create a new schedule.
- Edit this schedule
Edit selected schedule
- Change next run time
Manually edit the next run time.
- Make a copy of this schedule
Copy selected schedule with all
options. You need to select a new schedule name.
- Delete this schedule
Delete selected schedule.
- Delete all schedules
Delete all schedules and related
settings.
- Scheduler enabled (System Tray)
Enables and disables the scheduler.
Keep it checked under normal circumstances. This
setting does not apply to the scheduler service.
- Scheduler enabled (Service)
Enables and disables the scheduler
service. Keep it checked under normal circumstances.
- View report log for this schedule
Open the report log with a filter set to show only records for the selected
schedule.
- Scheduler service log
Control how much information is recorded in the service log file.
- [4] Enabled
Uncheck this option to disable the report schedule. (Applies to service and system tray mode)
- [5] Server Logon Information
Database logon information. What is required depends on how your report is
configured. You can enter the login information into each schedule or add
entries into the 'Server Info' screen with a 'Sched ID' of 0.
- Advanced
This give you the option of adding a Server Name and Database Name which is required for some report configurations. The advanced logon is required if you have more than 1 data source for the report. There is 1 line per connection.
In most cases you will only need to enter a user name and password unless you want to override the connection settings in the report.
- Server Name or DSN
Name of the database server or Data Source name used in the report connection. If the database is a file enter the entire path to the file and file name here (C:\Folder\Data.mdb).
- Database Name
Name of the database to use.
- User ID
User name for the login.
- Password
User password.
- Table Name
Name of the table to use for this login. Normally not required
but can be useful if you have multiple connections in a report and want to override the connection settings in the report file.
- [6] Report Parameters
This section allows you to enter parameter values that are required by your report. You can enter values or use the Easy View variables for dates and other automated settings.
If you have more than 1 value for the same parameter, enter 1 line for each value.
- [a] Parameter
Parameter name or number
- [b] Value
Value of the parameter.
- [7] Schedule
- [a] Name
Name of the schedule. Must be unique.
- [b] Report File
Full path and name of the report file to run.
- [c] Type
Mode to run in:
- Preview
Open the report in the preview screen
- Quick Print
Print the report only.
- Export
Select this option to export the report to a directory. You can also email and print the report from this option.
- [8] Statistics
- Last Run
Date and time the report was last run successfully.
- Next Run
Next date and time the report is scheduled to run. Double click the time to edit the next run time manually.
- Last Result
What happened the last time Easy View tried to run the report. See the Report Log for more detailed information. Double click the time open the report log with details about the selected schedule.
- [9] Run Times
Control the frequency the report is run
- Minute
- Enter the number of minutes to run the report. (e.g. every 15 minutes)
- Enter the number of minutes past the hour to run the report (0-59). This is only used to determine the first run time.
- Hourly
- Enter the number of hours to run the report. (e.g. every 6 hours)
- Enter the number of minutes past the hour to run the report.
- Daily
- Enter the time you want the report to run each day. (e.g. 5:00:00 PM)
- Enter the start date. (e.g. 1/1/2035)
- Check off each day of the week you want to run the report. By default it will run every day but you may not want to run it on certain days.
- Weekly
- Enter the time you want the report to run each day. (e.g. 5:00:00 PM)
- Enter the start date. (e.g. 1/1/2035)
- Check off each day of the week you want to run the report. Since the report is only run once weekly you can only check off 1 day.
- Bi-Weekly
- Enter the time you want the report to run each day. (e.g. 5:00:00 PM)
- Enter the start date. (e.g. 1/1/2035)
- Check off each day of the week you want to run the report. Since the report is only run every other week you can only check off 1 day.
- Monthly
- Enter the time you want the report to run each day. (e.g. 5:00:00 PM)
- Enter the day of the month to run the report (0-31). Enter 31 for the last day of the month. It will adjust automatically when a month has less than 31 days.
- Bi-Monthly
- Enter the time you want the report to run each day. (e.g. 5:00:00 PM)
- Enter the day of the month to run the report (0-31). Enter 31 for the last day of the month. It will adjust automatically when a month has less than 31 days.
- Enter the start date. Used to determine which month to start on.
- Quarterly
- Enter the time you want the report to run each day. (e.g. 5:00:00 PM)
- Enter the day of the month to run the report (0-31). Enter 31 for the last day of the month. It will adjust automatically when a month has less than 31 days.
- Enter the start date. Used to determine which month to start on.
- Annually
- Enter the time you want the report to run each day. (e.g. 5:00:00 PM)
- Enter the start date. Used to determine which month to start on.
- [10] Export Options
- [a] Format
This determines what type of file the report will be exported to. (e.g. PDF,
MS Word, Excel etc)
- [b] Export File
Set the file name and location to save the exported file to each time the report
is run. The variable <FileDate> can be used to date stamp the file or folder name. If the folder does not exist it will be created. You can type it in or click the 'Export File' button to browse for
the location and file name. You do not need to have the file extension at
the end of the file name (e.g. .pdf). Easy View will add this on when the
report is run.
- [c] Email File
Check this box to attach the file to an email and send it out automatically.
You will also need to include at least 1 email recipient, subject and message
for the email settings.
- [d] Overwrite File
If this box is checked Easy View will overwrite a file if it already exists
with the same name (e.g. C:\Report.pdf). If this box is unchecked, Easy View
will create a new file name so that the original file is not lost (e.g. C:\Report(1).pdf).
- [e] Delete File
Check this option to delete the exported report file after it is emailed.
This option is only available when the file is sent in an email.
- [f] Print
Check this box to print 1 or more copies at the same time the report is exported.
- [g] No Blanks
Check this option if you don't want to send the report when there is no data in
the report.
- [h] Options
Click this button to set any additional export options that may apply to
the export format. This is only available when the export format you are
using has additional options.
- [11] Email Options
- [a] To
Email recipient in the 'To' box.
- [b] Cc
Email recipient in the 'Cc' box.
- [c] Bcc
Email recipient in the 'Bcc' box.
- [d] Subject
Email subject.
- [e] Attach exported report
Check this box to attach the exported report file to the email.
- [f] Mail Type
Select whether to send the email using
MAPI or SMTP. For the report scheduler to work in "Service" mode you must select SMTP. You also must enter your email settings in email tab of the options screen.
- [g] Email Account
Email account to use when emailing the report. This setting applies only when emailing reports with the SMTP option.
- [h] Body
Message text that goes into the body of the email.
- Embed the HTML report into the body of the email
This option is only available when the report will be exported into one of
the HTML formats. When this option is checked, the output from the report
will be embedded into the body of the email instead of being attached to
the email as a file. This option is useful when you are emailing reports
to computers that may not handle attached files easily. This is especially
true for things like PDA's. In these cases it is better to embed the report
into the email body rather than send it as an attachment.
There are some limitations to using this method:
- You must export into one of the HTML formats.
- The report must be exported into a single HTML file. It can't be broken
up into multiple pages of HTML files.
- The size of the file is not unlimited. It is best suited for reports
of about 5 pages or less.
<< Previous - Next >>